This block is not for the beginner nor the faint of heart. But if you are an experienced and accurate quilter you should be able to achieve it. When I give directions I am going to assume that you have your fabric prepared and you already know how to do basic cutting and piecing.
You will need:
2 cutting rulers, cutting mat, cutter, sewing sundries, and a sewing machine
Not necessary but nice to have; a large square cutting ruler
Plenty of background fabric
5/8 of a yard for points (fortunately I had more as I messed up and had to recut)
18 1/2" square for center

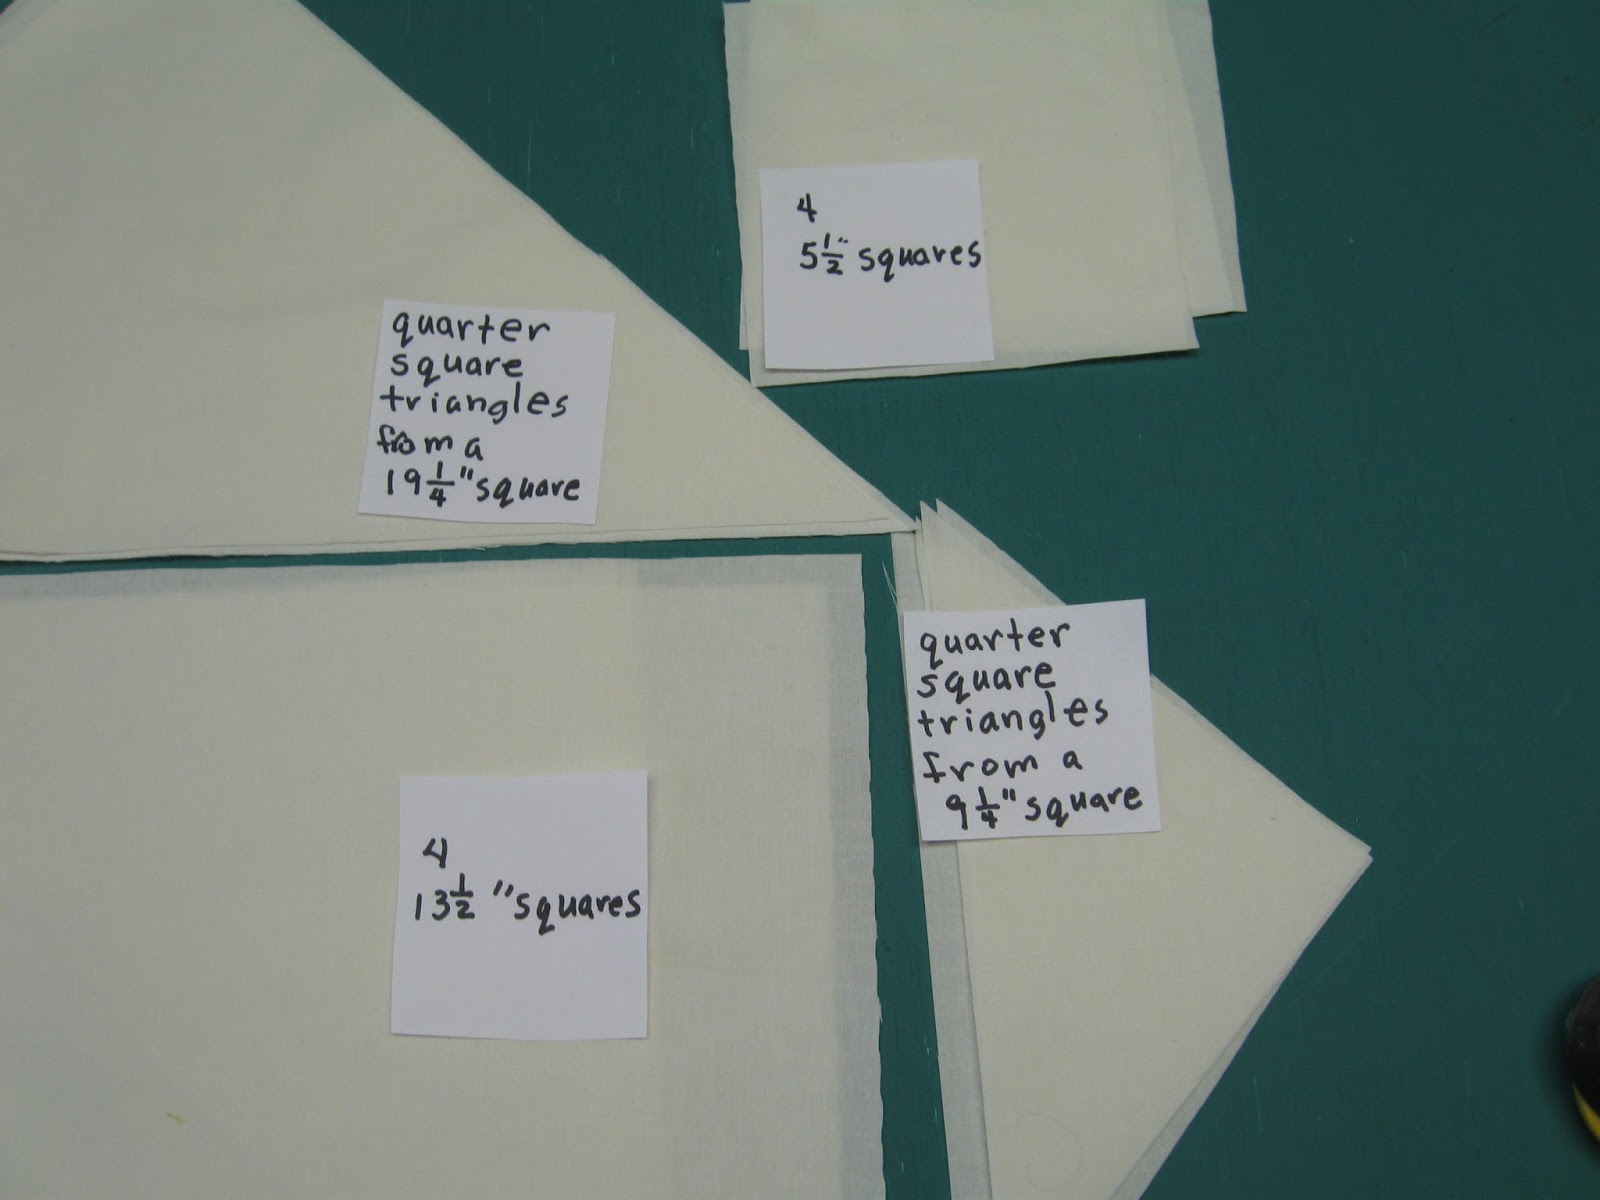
These are background fabric pieces that you will need.
One 19 1/4" square cut into quarter square triangles
One 9 1/4" square cut into quarter square triangles
Four 13 1/2" squares
Four 5 1/2" squares

Now is when we get to the biggest cutting challenge; what I call Mirror Image Truncated Triangles (MITT).
You will need two Widths Of Fabric(WOF), cut 9 5/8". Leave them FOLDED in half. You will be able to get two sets of MITT's from each WOF.

Notice where the selvages are located (to the right). Measure fifteen inches from the selvage and mark this spot.

Make a 45 degree edge to edge cut at that mark.

45 degree cut successfully completed at 15" mark. (point is pointing to the Left, selvages to the right)
Set excess aside carefully as you will be cutting a second MITT set from it.

Tricky part coming up. Pick up fabric layers and flip them over so that your point is now pointing to the Right and your selvages are now on your Left. You will be trimming this shape down to 13 7/8".

A little more clarity for this cut: You need two rulers to make this cut. The first ruler will be used to position the second ruler. You will be using the position of the second ruler to actually cut.
Take your FIRST ruler and place it along the cut edge of the fabric with the point falling just onto the 13 7/8" measurement on your ruler. Place the SECOND ruler alongside the end of the first ruler and remove the first ruler now trim off the selvage end using the second ruler.

Take the FIRST ruler and place it on the bias cut so that the corner of the ruler falls exactly on the point of the corner where the bias cut and top edge meet. Lay your second ruler along the end of the first ruler.

Remove your first ruler and and trim off the half of a square triangle.
LOOK at next photo to see the cutting ruler falling exactly on the point of the angle.
All of the positioning and cuts need to be very accurate.


Make the commitment. Cut off the half square triangle. Discard the half square triangles.

Open them up and admire your handiwork.
After you complete the cutting for this set of MITT's; gather up the excess that you had set aside, lay it out with the point to the Right and complete the cutting for your second MITT set from this WOF. Two sets of MITT's cut.
Repeat with second WOF for a total of four MITT's'
NOTE: When you go to cut out the second MITT from your WOF you will be trimming off the fold instead of the selvage.

Take a large quarter square and a small quarter square triangle and sew one to each MITT.

Press to the dark.

Pin and sew the seam, press. Repeat for a total of four units.

Center unit: For your 5 1/2" background squares; fold them in half diagonally and gently press. Open out the squares and place one on each corner of your 18 1/2" square, RST. The crease should run from adjacent side to adjacent side for each corner. Pin in place.

Sew each background square to center square using the crease as a sewing guide. Lay the 1/4" line of your ruler along the stitched line and trim off the excess triangle leaving a 1/4" seam (cutting through the background fabric and center square fabric). Discard these triangles.

Check the size of each MITT unit. Make sure that is 13 1/2" by 18 1/2". If it isn't; make is so.
You will now make a giant nine patch with your nine units. (One center square, four MITT units, and four 13 1/2 squares)

Sew two MITT units to center square like this. (Center strip of nine patch block.)

Sew a 13 1/2" square to each end of remaining MITT's like this. (Two outside strips of nine patch block.)
Lining up the MITT units perfectly with the center square is the hardest part of constructing this block.

Unacceptable to me. I ripped this out and redid it.

Baste all the junctions before completely sewing the length of the seam. Stab a pin through the seam 1/4" from the edge and into the seam of other unit 1/4" from the edge. Baste seam. Check. If necessary rip out and redo. Repeat until all seam junctions align perfectly.
Sew all three strips together to form a single block.

No comments:
Post a Comment